To ensure new basements are waterproof, it is essential that a suitable methodology is followed on site. This module, sponsored by Waterproof Concrete with Site Supervision, explains how designers can specify good workmanship

How to take this module
UBM’s CPD distance-learning programme is open to anyone seeking to develop their knowledge and skills. Each module also offers members of professional institutions an opportunity to earn between 30 and 90 minutes of credits towards their annual CPD requirement.
This article is accredited by the CPD Certification Service. To earn CPD credits, read the article and then click the link below to complete your details and answer the questions. You will receive your results instantly, and if all the questions are correctly answered, you will be able to download your CPD certificate straight away.
CPD CREDITS: 60 MINUTES
DEADLINE: 7 MARCH 2015

INTRODUCTION
Creating extra space at basement level is an increasingly popular option for new-build homes. However, basement leaks are extremely common and very difficult to fix. This is not usually due to poor design. To overcome expected leaks, designers often take a “belt and braces” approach, specifying external membranes, clay coverings and renders for the outside of the new basement, as well as internal drainage behind a stud wall on the interior.
Unfortunately, through no fault of the design or the systems themselves, this can be counterproductive. For a start, even if the basement doesn’t leak, this approach will have substantially reduced the basement space available for the client. Moreover, poor workmanship by any of the subcontractors, leading to a minor snag in one of the systems, can be enough to undermine the basement’s waterproofing. If such a situation arises, the number of different products used can make it difficult to identify the problem, the installer responsible and, therefore, who should pay for the repairs.
For this reason, it can be self-defeating to just add waterproofing features to the design. A less complicated approach is to ensure that the primary structural material is not just leak-free, but completely waterproof. This places responsibility clearly with one product and one subcontractor.
This CPD introduces a methodology designed to ensure that concrete basements remain waterproof – without the need for tapes, strips, membranes, render, clay, sump or pump. Under this approach, the subcontractor must build with the steel and concrete exactly as specified but is otherwise responsible for dealing with all leaks – these can only have resulted from incorrect application of the materials. All concreting work should be monitored by the client’s representative on site, who will note any failure to carry it out in accordance with the rules set out below.
Several suppliers include representation to some extent with their product, and Waterproof Concrete with Site Supervision offers representation throughout at no extra cost. In a number of trials with both inexperienced and experienced gangs, this approach has been consistently successful. Even though the concreting needs to be carried out a little more slowly and will cost slightly more, money and time will be saved overall.
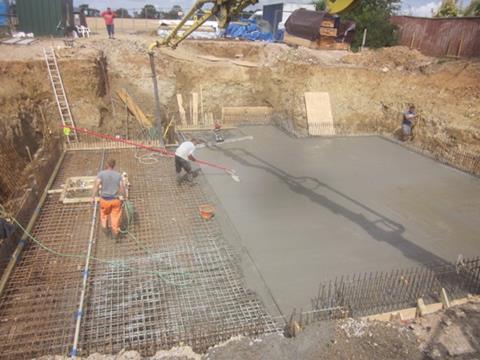
Role of the architect / specifier
The specification of the concrete mix is vital to the success of a waterproof basement project. The concrete should have a test certificate to BS EN 12390-8:2009, proving that the concrete delivered to and used in the project is completely impermeable. The base mix should be a minimum P350, CEM1 and over-sanded for pumping.
It should also include a powerful PCE plasticiser. This is because it is important that the concrete has a low water-cement ratio (WCR) in order to close off the network of capillaries. Water is needed to complete hydration – the chemical reaction that causes concrete to harden – but the powerful plasticiser provides the consistency required for the concrete to be placed and compacted easily with less water. The maximum WCR should be 0.45 – in other words, for every 1kg of cement used, no more than 0.45l of water should be used. For further details, refer to Building CPD 26 from 2014, “Waterproof concrete”.
No further additives should be added to the base mix.
In addition to specifying the correct concrete, the architect plays an important role in preventing water ingress beside or over the waterproof concrete. A thinner section in the concrete, hidden by the external finish, beneath thresholds, around basement windows and above the retaining element of the basement wall is a common, highly effective solution.
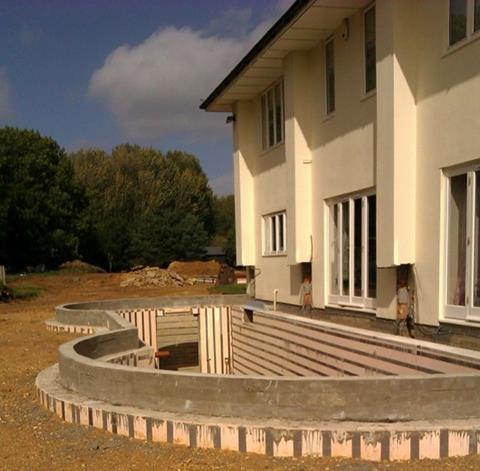

Role of the structural engineer
The structural engineer has to ensure that the steel reinforcement is designed appropriately to control cracking – an essential factor in waterproof concrete. BS EN 1992-3:2006/ Eurocode 2 does not contain formulae for crack-width calculation, stating instead that the engineer should rely on tests. Strong CEM1 concrete gets hotter and gains strength more quickly than CEM2 mixes with fly ash (which are difficult to waterproof).
Useful sources for crack-width calculation are:
- CIRIA C660: “Early-age thermal crack control in concrete”, 2007
- “Concrete basements: Guidance on the design and construction of in-situ concrete basement structures to the Eurocodes”, the Concrete Centre, 2012
One supplier of the plasticiser that waterproofs concrete has published its findings online, at www.waterproofconcrete.co.uk/structural%20engineer.html. Another supplier advises the use of a greater number of bars rather than thicker bars:
- In a 200mm-thick wall, A393 reinforcing mesh and 12mm starter bars on 200mm centres in both faces should prove sufficient. But in a 300mm-thick wall, this will not always prevent wider vertical cracks. Use extra 10mm distribution bars midway between the horizontal welded A393 reinforcing mesh bars – that is, at 100mm centres.
- At corners these extra bars need only cross by 10mm and straight lengths lap by only 50mm.
- Slabs tend to crack far less than walls, probably because they lose heat more easily than concrete held in formwork. A393 reinforcing mesh in the top and bottom of a 200-300m slab should be sufficient.
- At slab-wall joints, two faces of 12mm starter bars are not always sufficient to completely control cracking. As a minimum, 16mm bars should be used on the outside face and 12mm bars on the inner face, all on 200mm centres.
- Some engineers like to use capping bars all along the top of a wall, and sometimes even a central distribution bar. However, concrete cannot be poured through a tube to the bottom or properly compacted with a vibrating poker with this amount of obstruction. Instead, these same bars are particularly useful arranged throughout the wall steel on 1200mm vertical and horizontal centres. As will be discussed later, walls are more leak-free when poured in two half-lifts. Therefore these U bars should be in the first pour as well as the second, keeping the wall steel properly spaced apart throughout.
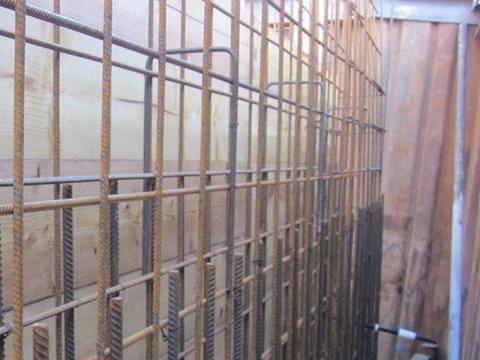
Role of the subcontractor
Using the waterproof concrete and reinforcement specified, the subcontractor builds the reinforced concrete structure. However, this all too often results in leaks through voids, dirt and cracks – which then require additional waterproofing products. However, if the following rules are followed, this should prevent the formation of voids, dirt and cracks, so that the specifier’s first choice of waterproof concrete is all that is needed to prevent any ingress of water.
Supervision
Training and monitoring of the concreting team is vital. Several concrete additive suppliers include monitoring in their pricing (to a greater or lesser extent). The presence of a competent person who is able to note where too much concrete is poured in one go, where the poker is missed and so on, reduces the occurrence of these mistakes. Standards will rise further if the specifier requests a report after every pour.
Kickers
Concrete kickers should never be used, as they are all but impossible to form with waterproof concrete. If they are formed at the same time as the slab, then the kicker concrete sinks into the slab during compaction. If they are formed with waterproof concrete much later, the concrete is too shallow to compact properly without losing the concrete as a spray. That is why kickers are generally made with the wrong concrete and are not compacted well enough to prevent leaks. Further details and techniques for avoiding kickers can be found at http://waterproofconcrete.co.uk/kickers.html.
Joints
Joints must be thoroughly scabbled – the mechanical or chemical process whereby a thin layer is removed from the surface. They should then be cleaned and kept clean until they are covered with sound waterproof concrete.
Tapes and strips in joints can be counter-productive, as workers sometimes relax their efforts to succeed with the concrete alone. However, there are occasions when a tape or strip is a wise addition, such as when casting a wall against the excavation, where absolute cleanliness is impossible.
Formwork
Concrete released from a pump or skip at the top of a standard wall loses grout to steel and formwork; crashes against the slab and segregates; and is often too far down for the poker to reach properly. For these three reasons, the bottoms of walls very often leak. To obtain good concrete throughout a wall:
- The vertical forms must be no higher than 1.8m for each pour. A vibrating poker should be used to compact the concrete, but this must be lifted no more than 1.7m from the bottom before it can be moved along so that even if it curls it still reaches the base, and the worker lifting this heavy item can do so for longer before fatigue reduces his effectiveness
- The space between the vertical faces of steel should be a minimum of 120mm throughout if 20mm aggregate is used, or a minimum of 80mm if 10mm aggregate is used. This is to be sure that a concreting tremie pipe can be inserted between the steel to within 1,250mm of the bottom before concrete is released
- Formwork tie rods should be threaded fibre-reinforced plastic, or another material that can be cast in to provide a lifetime waterproof seal without need of repair – because repairs get missed.
Concrete pour
- The concrete must be poured into the form at frequent intervals
- It must never be filled more than 500mm deep, after compaction, in a single pass
- Concrete must never be allowed to free-fall more than 1,250mm. This means that a tremie pipe will have to be lowered into the walls before discharging the mix
- The poker should never be held still. It is put into the concrete and withdrawn slowly, then moved along 200mm
- Before the formwork is released, the concrete must have cooled to an ambient temperature
- All formwork should be removed so that all of the concrete can be inspected
- Waterproof concrete is far from self-levelling and begins to stiffen quite quickly
- Usually an acceptable finish is achieved through pokering alone. If a smoother finish is required, a power float finish should be specified.
Adding the additive to the concrete
If this is carried out at the batching plant, the truck driver may not know exactly how much concrete is going into his lorry – for instance, if he is going to deliver the last part load. Therefore it should be carried out on site by a more competent person, such as a supplier’s monitor. Moreover, if the concrete is wrong for any reason, the monitor on site can check the ticket and take a look at the mix before the additive goes in – after which point the load must be accepted and paid for. The monitor’s presence beside the truck when it arrives also prevents unauthorised water being added, which is all too common on site.
Backfilling
The waterproof concrete must not be covered in any material that will hold any amount of water until the concrete has autogenously healed. This applies mainly to backfill.

How to take this module
UBM’s CPD distance-learning programme is open to anyone seeking to develop their knowledge and skills. Each module also offers members of professional institutions an opportunity to earn between 30 and 90 minutes of credits towards their annual CPD requirement.
This article is accredited by the CPD Certification Service. To earn CPD credits, read the article and then click the link below to complete your details and answer the questions. You will receive your results instantly, and if all the questions are correctly answered, you will be able to download your CPD certificate straight away.
CPD CREDITS: 60 MINUTES
DEADLINE: 7 MARCH 2015
Privacy policy
Information you supply to UBM Information Ltd may be used for publication and also to provide you with information about our products or services in the form of direct marketing by email, telephone, fax or post. Information may also be made available to third parties. UBM Information Ltd may send updates about Building CPD and other relevant UBM products and services. By providing your email address you consent to being contacted by email by UBM Information Ltd or other third parties. If at any time you no longer wish to receive anything from UBM Information Ltd or to have your data made available to third parties, contact the Data Protection Coordinator, UBM Information Ltd, FREEPOST LON 15637, Tonbridge, TN9 1BR, Freephone 0800 279 0357 or email ubmidpa@ubm.com. View our full privacy policy at www.building.co.uk/cpd














2 Readers' comments